Showing posts with label Craft. Show all posts

9.29.2011

Paper Curl Wreath


A Couple weeks ago I found This tutorial on a cute Website. I had been looking for a wreath, and thought it would be a great way to go (and cute for September) What I didnt realize..was how LONG IT WOULD TAKE!


First...I had to cut up 2 full books, a couple pages at a time in spirals.  Then, roll them into flower curls and glue them on to the form...and if you cant tell by the picture, there are a lot of them!


after a couple very bad glue burns, I am proud to say I am done! 
Just in time to take it down and put up my Halloween Wreath!


Posted by Picasa

11.01.2010

Super Girl Costumes...


I definitely have not been doing a lot of projects (as you've probably noticed) over the past 7 months...being pregnant, sick, with 3 kids at home has finally done me in!   So, here and there I try to do something a little fun...or of course, necessary.  This time it was the girls halloween costumes.

I had the skirts, and Elle's shoes...so I had to make their shirts, capes, accessories, and Jane's boot covers.

It was fun picking out fabric, for this project and I think they came together nicely!  I found the symbols online, enlarged and printed them and then used them as a pattern for their super symbols (and Jane's hairclip)  I made the capes button on, so they could be reversible. 

They looked cute and had fun wearing them on Halloween...did I mention I am glad that Halloween is over?
Posted by Picasa

8.04.2010

Baby Cowboy Quilt


Paying tribute to Texas (and trying to match this little boy's bedding)


I never thought Id like fabric with characters on it...but I love this lil cowboy print
Posted by Picasa

7.05.2010

Back Yard Art Projects for Summer!

My friend/photographer, Allison of English Photography, is doing the COOLEST backyard art projects this summer with her kids and friends.  I have loved reading about it...and hope to get the energy to do some of the projects with my own kids soon.  She has been doing them all at her house each week...maybe you could get together with some friends, and take turns hosting.
Click here for more information & more detailed instructions.

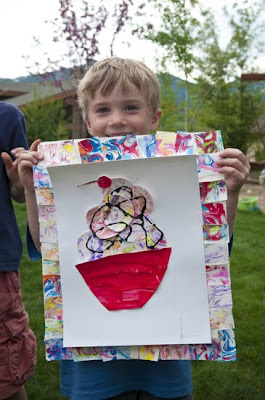
MARBLED PAPER ICE CREAM COLLAGE

They discussed how Eric Carle makes pictures...and then learned how to marble paper.  After it was dry, they used it to make ice cream collages.


BACKYARD AQUARIUMS

They used all different colors and patterns of tissue paper between wax paper to make beautiful aquariums.


SAND ART

They used glue and colored sand to make these flags.


VEGGIE PICTURES!

These were the tools they used:


Then they used a faster drying ink instead of paint to make fun faces!


I think this is such a fun way to add creativity to our little ones lives!!! 

6.28.2010

Furniture for the Forest Friends


My Mother in Law came up with this idea for the kids to do at the cabin. On cold days, or at night, we would build little furniture out of popsicle sticks and hot glue (the mattresses and pillows out of felt and cotton balls), and then at night we would leave them out for our forest friends.

we also made some little people out of pinecones.


the kids would leave nuts and raisins out for the little creatures...


and in return, they would leave surprises for the kids! My kids loved waking up to surprises!!!

(Rob and I got a little competetive with the furniture building...I one-upped him with the a bunk bed after his single bed...then he had to build the king cabin!
Posted by Picasa

5.25.2010

Changing Pad-the smaller version


OK, so if you are loving the quilts...but want to make 2 for the same amount of fabric...try the changing pads!
I did mine 18X25 and then sewed in some grosgrain ribbon.

EASY, BREEZY, BEAUTIFUL!


Posted by Picasa

5.15.2010

Your First Quilt-tutorial

You will need:

8 coordinating fabrics in the following sizes:
1 yard of the back of the quilt fabric
1/4 yard each of the 6 stripe fabrics
1/4 yard binding fabric

1 yard muslin
1 yard batting (or a 35X35 inch piece)

Decide which order you want your stripes.  Cut them out in different widths:
STRIPES:
3X35
5X35
4X35
6X35
3X35
4X35
sometimes I change the size or order a little if I like one fabric more than another.  It is easiest to cut the widths first and then cut the length all at the same time.  (I cut mine on the folded at 17.5)
cut your binding fabrics
3  pieces of: 2 inches X the length of the fabric (cut one more piece if you arent putting inserts: see quilt below to see insert)
2 pieces of 2 X 9 (for the inserts if you want to do them)


Main fabric, Muslin & Batting
35X35 of each.
(it is easiest for me to lay out one of my fabrics on the batting and cut around it to make sure it is the right size)


Iron your pieces (ESPECIALLY your main fabric and muslin)


layer your main fabric on the bottom, then your batting, then your muslin and try to smooth out all the wrinkles


lay out all your stripes.  If you still have a little fold line left over after ironing, it will help you line them up.  just eyeball the distance between each one.  Make sure to leave a little extra room at the top and bottom because your binding will take an inch of the white space.


Pin them down through all 4 layers

Now you can sew your stripes leaving a quarter inch seam allowance.  NOTE:  I was advised to buy a "walking foot" to make this quilt.  It did help...but I believe you may make this quilt with your normal foot as long as your batting isnt really really thick.


cut your binding into the right size.  2 inches X 37 inches on all 4 sides
(if using the inserts, cut 37 inches on 2 of your strips.  Then use the left over 7 inches and sew it to the inserts, and then cut the last strip in half and sew those pieces to the other side of the insert.  You should have enough to make 4-37" long pieces. 


Iron your binding fabrics in half.  (if using inserts, first iron the seams down, then iron in half)


Pin your binding around the quilt by folding it around the quilt.

If you use the inserts, you can decide where to put those ones.  I have done it so that the inserts are along the stripe sides and one is high on one side and low on the other side. 

FOR THE CORNERS: every strip that you pin down should go under on one end and over at the other end.  Where it goes under the binding, you can sew it straight down, where it goes over the following binding, fold the raw edge under.  I hope you are not too confused...look at the quilt corners to understand.

sew the binding down using 1/4 inch seam allowance.


Now, go wash your quilt normally in the wash and then dry.  Then trim all of the millions of long strings.


WA LA...Your FIRST QUILT!  You should be so proud and one little muffin is going to be So excited!

Posted by Picasa

5.14.2010

embellished tee


sometimes you just have to embellish your own tees (this one was from the dirty clothes pile...hence the wrinkles!)


I picked up a shirt at JCREW (for 49.00) just like this and thought...why dont I just put black flowers on a shirt and save 45.00?


Then...I decided to add letter beads to make it my own

Posted by Picasa

5.07.2010

Scrappy Apron

After I made the quilts, I had LOTS of little scraps left over.  I was about to put them in the scrap fabric box...when it occured to me.  I could try to make an APRON!  I know I know, you have been making them for years...but these are my very first aprons.  I started with the little girl one (bottom left & far right) and then made one for myself.  I did NOT have a lot of large pieces to work with, so as you can see I just kept sewing pieces together to make it work.  
Hooray...no tiny scraps and a NEW apron! 


If you want a tutorial...let me know, Ill make one. 
I just kind of made up the design, but turned out cute if you ask me!
Posted by Picasa