12.19.2008

Easy Pinkalicious dessert party


This year Elle's Birthday had to be simple. With a pregnant mommy at Christmas, I had to make it cute but EASY!

We did a joint party with her little friend who turns 2 a week before Elle. The invitations were really simple. I used the scallop edger by "stamp it up" and the flower punch by them too. I usually dont buy from them, but I could not find these anywhere else!

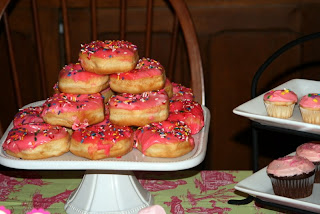
We did an openhouse with 6-7 families. We served pink punch (raspberry sherbet and sprite) cake and peppermint icecream, pink frosted doughnuts and cupcakes. Sugar high!
These tissue balls are super easy to make (though I have never made one! I borrowed these from a friend who had just had a party!) You accordian fold tissue paper together, cut the edge in either a point or a scallop, wrap wire around the middle, and then pull it all apart!
I found this table cloth on sale at William Sonoma. . It was fun to be pink, but not ALL pink!

I used the "great cupcake" pan by WS.

Ordered strawberry frosted doughnuts from Shipleys, and then made a bunch more cupcakes for the little ones.
I did 2 cakes for the 2 little girls...then they could both blow out candles!

This was an easy way to do a little birthday banner. I just used my punch and stuck the letters on old fashioned candy sticks...and stuck those in pebbles in buckets.

Then I gave away the old fashioned candy sticks as favors. I ordered them from "Lehi Valley," but I found a ton of places online. I think they had the most reasonable shipping!
And there it was...a little pink openhouse!!!

12.10.2008

Neighbor gifts...


For the past four years I have made caramel and chocolate covered pretzel gifts for neighbors...so I thought Id better continue the tradition!

You will need: pretzels rods, kraft caramel squares, white chocolate chips and milk chocolate chips.

I add a little water to the caramel and then melt it in the microwave, and dip the rods in caramel. I use the back of a spoon to roll the caramel off and leave a thin layer. I lay them down on parchment paper and stick them in the fridge.

I dont add anything to the chocolate before I melt it, I put it in for 1 minute and then add 15 seconds if it needs it. I dip the rods in the chocolate just as I do with the caramel, using the same technique with the back of the spoon.

After they harden I drizzle the opposite color on them and then, WA LA!


I also made PEACE blocks...cause lucky for me, not a lot of people know about vinyl here!

And for Robbie's teachers, I made Spanish Christmas trees.

Neighbor gifts...Check!
Posted by Picasa

My new favorite: the gift tag punch!


This year I bought a gift tag hole punch at Michaels. I didnt know if I would ever use it, but thought it would be fun to have. WHAT? I have used it tirelessly since I got it! One day last week, Robbie came down with a stack of gift cards he had punched out with all of my patterned scrapbook paper...what a novel idea! So now, I can print on the one side and have a cute pattern on the other! Amazing!
Posted by Picasa

decorating...its worth it!


I am so glad Kathy and I made all of those blocks last year...I have found places for most of them!


Even just to hide a mess!


I have not figured out my "dream ornaments" yet...so this year we did the costco special. And guess what, they are SHATTERPROOF!


I found a place for a kid tree. Robbie had SO much fun decorating it. Unwrapping the ornaments was like a little Christmas in itself.

It's nice because Rob loves coming home to "Christmas Land." With a little music and mulling spices, we enjoy the Christmas Spirit right from the living room.

It took an entire day to put up and will take an entire day to take down...but in the meantime, I will love it love it love it!
Posted by Picasa

Decorating...its worth it!


Since we are always gone for Christmas, we never decorate...but this year since I have to stay home...I pulled out ALL of the bins!

I love this ornament tree from Urban Outfitters. It is my first time using it and all the russian ornaments on it!

What is the use of collecting nativity sets when you dont put them out, I got out all 20 of them (but not my Russian one cause I would cry to have one of the kids break it...give me a couple more years) Here are the foreign ones. The "replaceable" ones are in the other room!

So Im starting to collect stockings too...not so smart. I only put out 2 sets this year and I think i am just going to have to hold back on buying more until I can figure out what you do with them!
Posted by Picasa

Gift wrap for little girls...


Make the wrap part of the present! I made these bows for Elle's little friends and clipped them on top of their gifts. They were fun to make and top off the gifts quite well!
Posted by Picasa

11.20.2008

Ribbon Board


One way to hang up bows or pictures is by using a ribbon board. PBK had one a couple years ago and for those of us who missed out, we must make our own. EASY project...so listen up!
Choose a canvas, whatever size suits you. Then cover it with batting and white fabric, stapling it to the wood in the back. Then choose your ribbon, and lay it out in straight lines, stacking some if you want. Staple the ribbon to the back, just like you did with the fabric!


Here is my friend Kathy's. It is an 18X24...turned out perfect!


Here is mine, a 24X30 which means a TON of ribbon. I was so stressed out about colors...but I really do like how it turned out. (this is not the paint color of the room it is in!)

In the end...does it really matter which ribbons you use? I cant even see the ribbon anymore!
Posted by Picasa

baby gift applique...


OK, I know I go a little overboard with appliqueing things...but I thought these onesies just needed a little something!
Posted by Picasa

11.07.2008

turkey projects for all ages!

If you have a playgroup and you dont know what to do...these are fun and easy!


This is for age 18 mos.-2 years. On paper, quick, easy, last minute!

This took a little more preparation for 3-4 years. Styrofoam balls painted brown, foam paper cut out in shapes, googly eyes, and feathers!
Posted by Picasa

Why not make a magnet board?


Today I woke up thinking about making a magnet board. I have seen them at friends' houses but dont have one in mine. So, I went to lowes and bought some sheet metal (you better go there first, to see what sizes they come in, before you buy the frame) I picked 24X30. Then I went to Michaels to get the red paint and the frame. I did have to trim my sheet metal just a bit (the metal cutters were $10 at lowes) but pretty much, it was an EASY project!

I finally took out these letter magnets out, that have been hiding in a bag for 2 years!
Just one more addition to the kid's playroom (and a lot less things on the fridge...for those of you who have them on your fridge!)
Posted by Picasa

11.04.2008

It's PIE time!


If you are like me, you are probably just taking down Halloween...trying to shift gears to Thanksgiving! It is about time I do, because according to Martha, I should be making my pie crusts and freezing them already! Last year I did this, and it made a world of difference on Thanksgiving. You can make your pie dough, form it in your pie plates, then cover in seran wrap and freeze. I also made pans full of these cookie cutter shapes so that they would be ready. I guess I better get working!


Posted by Picasa

10.25.2008

Halloween Party 2008!

Here it goes, the complete Halloween Party run-down!

Invitations were SO simple. We used the saying:
"It's a Halloween Party
You're in for a Scare
Prize for best costume
Be there if you dare!"
You'd be Ghoulish not to attend!
(please find babysitting for a haunted night out!)
PREPARATION:

Melissa and Kristin (who cohosted the party) came over a couple days before to set up the table. We used black fabric, silver webs, pewter dishes and black candlesticks, plates & napkins.

We set up the dessert table and drink bar the day of...(I couldnt close those rooms off to the kids!)
DAY OF...
I only used tea lights in paper bags to decorate the front, a couple pumkins and a wreath.
This poster was right in the entry...I wanted to let people know they were in for some fun games! (and to stick around for the costume contest!
We made sure to have great prizes for the costume winners. Everyone voted, and we had some clear winners! We decoupaged the black and white paper to the lids of the jars to match the theme.
Of course we needed candy on the table! I also put out halloween books to look at. We had halloween movies playing on the tv on mute and then had Halloween music in the background.
The finished table with food. Miranda came up with all the food labels! I emailed her a list of food and within minutes she emailed me back a list of names!
Tortilla chips: torn skin crisps
Chili dip: brains and beans
Tomato, bean, corn, cilantro salsa: pick in your eye-o
7 layer dip: 7 feet under
Normal red salsa: vampire blood
Sourcream dip: rabid dog froth
Green salsa: pile of bile
guacamole: cold mold
Baguette slices: fresh flesh
Spinach dip: creamed ghost gizzard
Hot artichoke dip: choking heart parts
Hot water: burning acid
Hot cocoa mix: ground sweet bones
Marshmallows: ghost cutlets
Bubbly root beer: hell broth
Ice water with scary ice: goblins bath
Pumpkin pie: jacko’s flesh pie
Whip cream: ghost guts
Apple slices: bat nibblets
Caramel dip: sweet joint juice
cream puffs: mummy eyeballs
Brownies: death by chocolate
I cant believe I dont have a picture of the drink station in action.
We had hot water and hot chocolate, and the coolest looking rootbeer that we kept adding dry ice to. Then water with ice that had spiders in it.
Bobbing for Apples. I got these great tins at Lowes for 15.00 each. I figure I can use them every year...and they would be great for a big bbq with sodas!
We strung a rope from 2 trees and then hung 10 stings from it to hang the doughnuts! We had at least 20 participants!
Prizes for all winners/participants that wanted them!
Things I would have done differently:
of course we had too much food...but that means lots of left overs!
No pumpkin pie next time!